Search My Blog!

Showing posts with label DIY. Show all posts

July 30, 2016

Summer Passions - Canning Season Part 1

One of my favorite things about the summertime is being able to cook with and preserve fresh and local ingredients!  Last year, we did a CSA for the first time and loved it!  (Click here for more information about our CSA, or CSA's in general.)  We chose to do a CSA instead of a big garden for the past few years because having a toddler means giving up some of your hobbies - and gardening is one that takes a lot of time and energy so I cut back in the garden quite a bit.

This year, I have carrots, radishes, potatoes, and beets going in my garden, and most of them are still growing so we will see how they turn out. Along with our own garden veggies, we have been going out to pick your own orchards, getting produce from friends, and ordering extra from our CSA in order to gather the supplies for LOTS of delicious canned goods!  

This season so far I have made the following:

 - Strawberry Freezer Jam
 - Rhubarb Conserve (Conserve is like preserves, but with citrus and nuts)
 - Pickled Radishes (various types, from our garden)
 - Green Tomato Chutney
 - Bread and Butter Pickles
 - Gingery Pickled Beets

Here is some eye candy of all of those lovelies:
Rhubarb Conserve
Bread and Butter Pickles
Strawberry Freezer Jam
Pickled Radishes
Green Tomato Chutney
Pickled Beets
We use our canned goods as gifts, and to eat throughout the winter, fall and spring!  There's something so wonderful about opening a jar of something that you have made yourself - its one of my favorite things!  Plus with our diabetic daughter, it really allows me to control how much sugar goes into what we are feeding her!

Hopefully, early next week we are going blueberry picking, and I'm definitely making more (dill) pickles as well as some jalapeno pepper jelly in the next week or two!

Do you do any home preserving?  If so, what is your favorite thing that you make?  Or what is your favorite home preserved snack that you've ever had? I definitely love a good pepper jelly with cream cheese and crackers - or some fresh dill pickles on a roast beef sandwich!  =)

July 24, 2015

Summertime CSA Goodness - Pickles Edition

Hello there readers!  I hope everyone has had a great week!  I know it has been SO great to see the sun shining in Pittsburgh!

I want to start by talking about a great decision that we have made this year - joining a CSA!  CSA stands for Community Supported Agriculture, and it basically means that you pay for a share in the goodies from the farm's growing season!  We paid for the entire season in May, and then from June - October we get a box of fruits, veggies and herbs once a week!  It's a really great way to try things you might not pick up at the grocery store, and to support local agriculture!

Another added benefit of our particular CSA (all work a little differently) is that we can order extra or specialty items each week as well!  This is really great for me during canning season, so I can order extra fruits and veggies to preserve for the whole year!

This week I loaded up on the pickling cucumbers - they were way cheaper than the store or other farmstands would have been AND the quality was awesome.  Even when I've grown my own pickling cukes, I never got ones that were this tasty, size appropriate, and crisp:

I mean, seriously.  Aren't these beautiful?

I had about 5 pounds of cucumbers, so I broke it up to make both fridge dills and bread and butters. I divided the batch into 1.5 lbs for the bread and butters and 3.5 lbs for the fridge dills - my favorite!

I find that when it comes to dill pickles, I get the best results making short term (fridge) dills that aren't water bath canned.  Honestly, they never last too long anyway in my house because they are so tasty!  I use a Bobby Flay recipe that I originally found over at One Perfect Bite.

            Sliced cukes mixed with garlic and dill.                                        Packed pickles in the jars after an overnight brine bath.

 Beautiful jars of briny goodness.                                                     `             All ready for the fridge!        `

As for the bread and butter pickles, I find those are much better when they are water bath canned.  I don't prefer the bread and butters, but my husband LOVES them on sandwiches so I always make him a few pints!  The recipe that I use is from one of my favorite canning cookbooks, Food in Jars.  Marisa also has a website with lots of great recipes and tips!  But I really REALLY recommend buying her book -- it's a great canning resource!

                                             Bread and butters getting heated through.                                               Finished bread and butters ready for the pantry!

The quality of the cucumber that you use definitely matters - so try to go as fresh and local as you can!  Being a mom now, I don't have as much time for my garden as I used to, so I only grow certain things.  Joining the CSA has definitely helped me to continue to get some of my favorite fruits and veggies in large quantities without having to grow them myself!

Are you canning anything exciting?  Do you belong to a CSA?  I'd love to hear all about what you are doing with your own gardens this time of year!  =)  Thanks for reading!

August 1, 2012

Pinterest Project #3 - DIY Magnet Boards

Hello readers!  I hope you have been enjoying this little series on my blog!  I'm having so much fun doing these projects -- I've already finished the 4th one and I'm working on #5 as we speak!  =D

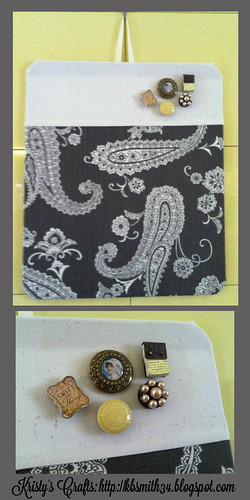
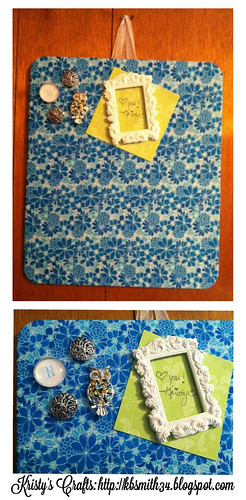
So EVERYONE who loves DIY has seen many places with these little DIY Magnet Boards, and I have several pinned as well!  I basically took the idea and started from scratch!  I got a GREAT product that is fun and very versatile!  Best of all, you can make it from using MANY things that you already have!  I did one completely from scratch and one with minimally purchased materials!  My DIY from start to finish is on the one that I bought everything for, so here goes:


1.  A flat (or almost flat) cookie sheet!  I got mine at Ollies and paid $2.99 for it!
2.  Fabric for the front and back.  My front fabric is a fat quarter from JoAnns that was 40% off ($1.29) and the back fabric was on clearance so I got a half yard for $2.25 and I can still make at least THREE more backs with that.  
3.  Various trinkets to make magnets with (I often go through Michaels $1 bins) - total purchase price for these goodies was $4.  
4.  Magnets to fit your items from #3.  I had the black ones already but retail this would cost about $4 with coupons.  
5. Spray adhesive and various other adhesives all of which I had (I used E6000 to attach the magnets and around the corners of the back)  The glossy accents and the white puffy paint I used to enhance the glossiness of the white photo frame.  
6. FLAT Ribbon or cord to hang the project (use what you have.)  

So in total, this project cost me about $16.  But when I used fabrics and buttons/jewelry that I already had to make it, it was closer to $8!  =) 
Ok!  So now it's time for the assembly!  Here's what I did:  

To start, iron all of your fabrics, cut them to size based on the size of your cookie sheet (add 2 inches to each side for the front and 1/2 inch to each side of the back when you cut).  Also, if your cookie sheet has a raised edge, you can use a rubber mallet to pound it flat if you like.  Also, make your magnets!  

Now, here's the instructions on the magnet board itself: 

1.  Use spray adhesive on the front of the cookie sheet.  Lay the fabric down starting at the top and carefully pressing as you go down to make sure there are no air pockets or wrinkles.  
2.  Turn your cookie sheet over and spray adhesive on the outer inch of each side.  Flatten the sides and leave each corner until all of the sides are down.  
3. Spray each corner and carefully fold down the corners tightly to get nice, rounded edges.  
4.  Add your cord or ribbon.  I added mine with just several pieces of regular packing tape since I'm going to finish the back.  

5.  Take the back piece and iron down about 3/4" on each side.  Snip the corners so that they look mitered.  
6.  Once you have pressed the hems down sufficiently, take the corners and press them down towards the middle as shown.  
7.  Press the fabric from the front to get out any wrinkles AND to secure the hems.  
8.  Use spray adhesive to attach the backing to the cookie sheet.  The edges, corners, and ribbon area will not connect with the spray adhesive well, so use another adhesive (E6000, Tacky Glue, etc) on those areas and set something on them until they are glued down well.  

And then you have your magnet board!  I have made two of these so far, and BOTH were great gifts for friends and family!!!  Here's the finished products:  


As you can see I did go back and make one more custom button for my board since that one was for my sister!  =)  Also, on the paisley board I didn't hammer down the raised edge of the cookie sheet but it still looks just fine!  Thanks for reading and as always leave me some feedback!  Happy blogging!  =)

July 1, 2012

Pinterest Project #1 - Ticket Shadowbox

Why hello there blogland!  I must admit it has been quite awhile!  I have much to tell you - and even much more to share!

First of all - I've been really REALLY taking a step back from cardmaking.  It's not that I don't love making cards, but lately I've really been trying my hand at lots of other crafty things!  I'm still working with some paper, but I'm also branching out more into things involving fabrics and mixed medias.  =)

One of my big inspirations (as many of you could probably guess) has been Pinterest!  So this is going to start a series of posts I'm calling "The Pinterest Project."  I'm on a mission to make fun and easy DIY projects for $20 or under!  Many of my projects (like this one) will be MUCH cheaper than that even!!!  =D

So one of the ideas that I got from Pinterest was THIS POST that shows some really awesome shadow boxes that are dedicated to tickets from events that you have been to!  I had an idea to try and make one on my own, and it turned out REALLY great!  Here's the products that I used:
  • An 8x11 shadowbox from Michaels (originally $10 but I got it 40% off for $6)
  • One piece of PTI's Smokey Shadow Cardstock (any similar gray cardstock retails for about $1/piece at most)
  • Some awesome free printable tickets that I printed myself (free!)  
  • Silver and Gold Ribbon from Really Reasonable Ribbon (retails for $1.25 for 5 yards, so $2.50 for WAY more than you'd need)  
  • A permanent black marker or ink pen (I had this product) 
  • Various adhesives that I already had (Tombo Permanent Adhesive for the ribbon, Tombo Aqua Liquid Glue to attach the cardstock to the back of the shadowbox, and a Zig 2-Way Glue pen to adhere the tickets to the cardstock)
  • I also used an x-acto knife and my hubby helped me with a jigsaw to cut the slit in the top of the shadowbox!  
Now, this whole project cost me at MOST $9.50, but I only actually spent $6 on the shadowbox - I used supplies from my crafting stash that I already had!   I would encourage that most of you should do the same - use what you have lying around and I'm sure yours will turn out just as awesome! 

I started by taking apart the shadowbox and measuring out the slit on the top of the box.  I used my x-acto knife to outline the slit in the top of the box, and then my husband cut it out for me!  I made my slit 4" by .75" - which I figured would be large enough for most of the tickets I'd want to put into the box!

Next, I started on the background of the shadowbox!  I cut down the cardstock to fit the back of the box.  Then I printed out the tickets and cut them out as well.  I arranged the tickets on the top of the box and adhered the ribbons to the bottom of the cardstock.  Once everything was glued down I glued the cardstock to the back of the shadowbox.  Because the Tombo Aqua Liquid Glue needs time to set without curling the paper, so I put a heavy book on top of the back of the box while it dried.

Once the glue was dry, I wrote "Smith Family Memories" on one of the tickets!  =)  Now my shadowbox is ready to be hung up and used!  We plan on using ours for sporting tickets, movie tickets, concert tickets, and other festival/event tickets since we are always doing things like food festivals and beer festivals etc!  Here's a picture of the finished product:

Because it's a shadowbox, I had a hard time photographing the details on the tickets in the entire box, so here's a closeup of the tickets:
I hope you enjoyed Pinterest Project #1!!!!  I hope that you look forward to many more of these projects and that you enjoyed this tutorial!  As always, your comments and feedback are precious and I love reading every one of them!  =)

Have a craft-tastic day!  =D